| Tips on Maintaining Your Series Land Rover |
Series Land Rover Maintenance Schedule Notes
Oil Changes: Every 3,000 miles or 3 months, whichever comes first [in case of only occasional use, twice annually].
The best oil to use is Castrol [or similar quality brand] 10-40W; alternative viscosities would be 10-30W or 15-40W. You’ll need 7.5 quarts for the sump/engine and one quart for the pan of the air cleaner.
|
 |
| Series Oil Bath Air Cleaner and hose to carburetor |
|
|
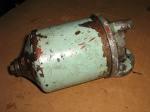 |
| This oil filter housing encases a removalbe cartridge inside. Separate top from bottom by removing the center bolt. |
|
|
Always run the engine for 5 minutes to completely warm it up, then drain oil [7 + quarts] from sump – drain plug [13/16” socket or wrench ] is on bottom of engine, on right side of car.
To change oil filter cartridge:
The oil filter canister is underneath the car, on right side of engine; the photo above shows it on its side. Lying under the car you’ll be looking at the center bolt. Remove center bolt [5/8”] to loosen filter canister and split it from the top. When bolt is removed, the canister will pull away from car. It will be filled with a ˝ quart of old oil, so try not to tip it to one side. You will need an O-ring pick [looks like a dental pick and available cheap at any auto parts/tool store] to remove the O-ring, which resembles a black rubber band, from the inside of the oil filter housing. If you get a Land Rover cartridge, you will receive a new o-ring to replace the older one. If you do not have an o-ring pick, then just leave the old o-ring in place for a couple of oil changes.
|
 |
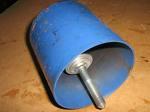
| The replaceable oil filter cartridge comes with a removable o-ring |
|
|
 |
| Oil filter canister with center bolt, cartridge plate and spring hidden in this photo] |
|
|
Ignition System
Generally speaking, check the points gap twice a year. The gap should be .014-.016 using a feeler gauge. In occasional use, you should replace the points, rotor, condenser and cap every two years. In regular use, I’d recommend every 6,000 miles for a check, every 12,000 miles for replacement of parts.
The ignition system consists of a distributor [with cap, rotor, points, condenser], spark plugs, spark plug wires, and coil. In the case of this Rover, you have the “new style cap” and “red non-slider points.” The rotor and condenser will be identified in the same way. Check your points for color [blue or red] and shape or style, and let your supplier know which set you have.
The parts that needs maintenance are inside the distributor. When you remove the clips on the side of the distributor and lift up the cap, here’s a view of what’s inside:
|
 |
| All points-style distributors work in similar ways. All will look like this with the rotor removed, |
|
|
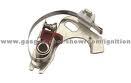 |
| All points have a rubbing block on one side, and a connection to the condensor. |
|
|
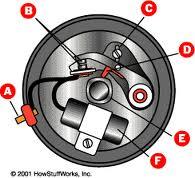 |
| This diagram shows the points and condensor in place. |
|
|
To adjust points, remove cap and rotor [slides up and off]. You will see the points as in Figures 2 & 3. You will want to turn the motor [counterclockwise] so that the lobe of the center shaft moves the points apart; in other words, the points rubbing plate should rest on one of the four corner lobes of the distributor’s center shaft. Using a feeler gauge of the correct thickness, slide it between the points. If it can slide tightly between them, they are gapped correctly.
Over time, points tend to slip closer together and/or become pitted through the build up of carbon deposits. If your points are not shiny but dull black with pitted/pointed surfaces, take an emery board [used for trimming fingernails] and slide it between the points. After filing gently, remove any residue with a spray [compressed air, brake cleaner] and then tighten the screw and reassemble components [don’t forget the rotor as I often do].
If you’re replacing the points, remove the adjustment screw [use a magnet as it’s easy to lose inside the distributor] and lift up the points. You will find the condenser wants to follow, so remove that hold down screw, too. Slide the condenser wire connection out of the points, take the new points and slide in the new condenser. Screw the points plate [loosely] and condenser [tightly] without worrying about adjustment yet.
The points will have a tiny peg at the bottom; the peg goes into a little hole in the distributor plate. The adjustment screw fits into the oblong hole at the top of Figure 4.
Get out your crank and slowly turn it clockwise – the distributor shaft will turn counterclockwise. When the red rubbing plate moves onto the center shaft lobe, the points will separate and that’s where you will set the adjustment by opening/closing to the correct distance. When correct then tighten the adjustment screw. Check the gap again as it’s easy for the points to move as the screw is tightened.
Spark Plugs
Spark plugs are changed every 12,000 miles. I would check them once a year. When you reinstall them, use a light coating of “Never-Seize” or some similar product so they come out again easily in the future.
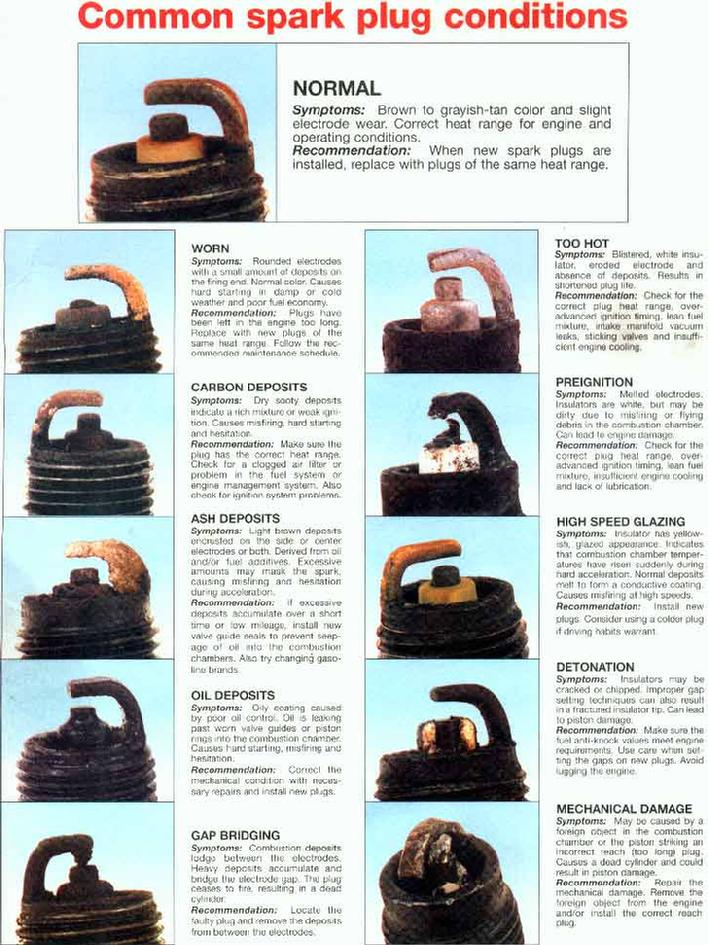
An engine in good condition should have plugs that look "normal" when removed. However, in case you run into a problem, here’s a good diagnostic chart.
|
|